I recently wrote an article on using Windows Task Manager to periodically run Python scripts. I currently have a couple scripts automated to run every day at 10:00PM using this method. Theoretically, you could use this method to update a Notion database. So in this post, I will cover how to use Python to generate automated stock alerts using the Notion API.
Pre-requisites
You will need some knowledge of REST APIs, especially GET and POST requests. We will be using these methods to interact with the Notion database.
You will need to have Python 3 installed on your PC. You can download Python at this link.
An existing Notion account is also required for this to work. To create an account, visit this link. For the rest of the post I’ll assume that all the pre-requisites are understood and complete.
Create a New Database in Notion
To create a database in Notion, you can follow this guide. It generally involves creating a New Page, adding a Table to the page, and connecting that Table to a New Database.
Once you have the new Table added, define the columns as follows:
- Ticker (property type: Title)
- Date (property type: Date)
- Action (property type: Select, two options: “Buy” and “Sell”)
- Reason (property type: Text)
You can obviously add more or less columns after reading through the article. To be successful you must understand how to work with at least these four property types.

Setting Up a Connection in Notion
To interact with Notion through it’s API you will need to do the following:
- Create an Integration within Notion.
- Save the Secret Authentication Token associated with your Integration.
- Connect the Database with the Integration.
Let’s take this step by step.
Creating an Integration within Notion
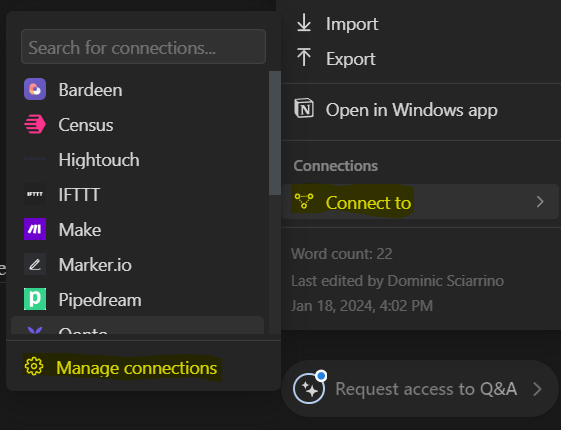
On any page in Notion, click on the three dots in the upper right hand corner. In the menu that appears, scroll down until you find Connect to. Then click on Manage connections.
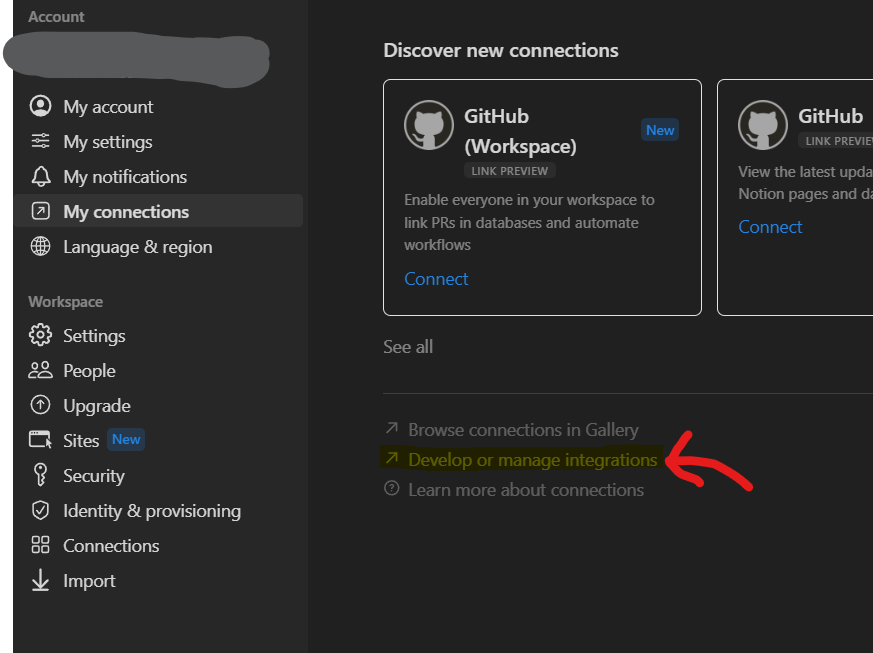
Then, in the My Connections section, find and click on the link titled Develop or manage integrations.
Click on Create new integration. On the page that follows give the integration a name. You can optionally include an icon if you want.
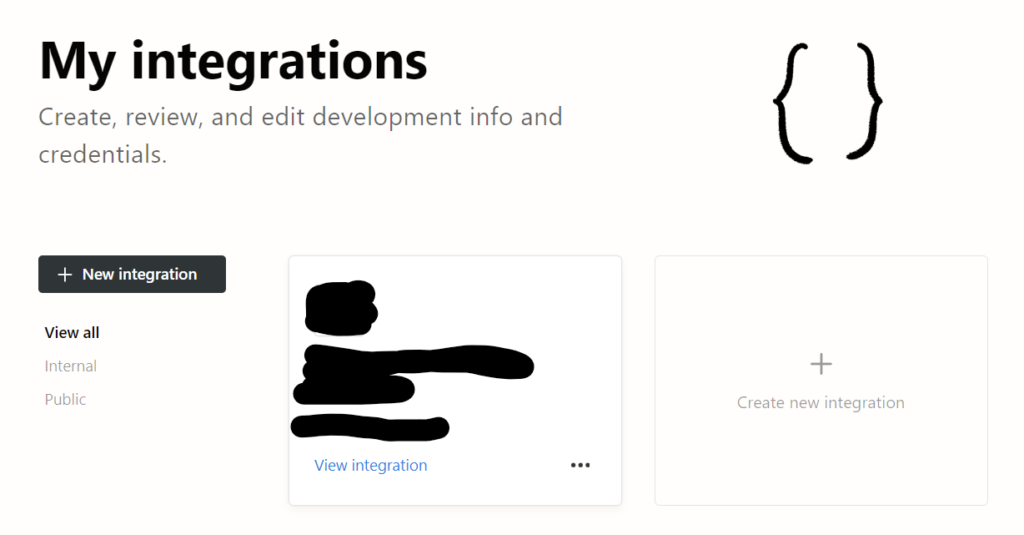
For this demonstration, I called it QuantasticTesting. Click on Submit.
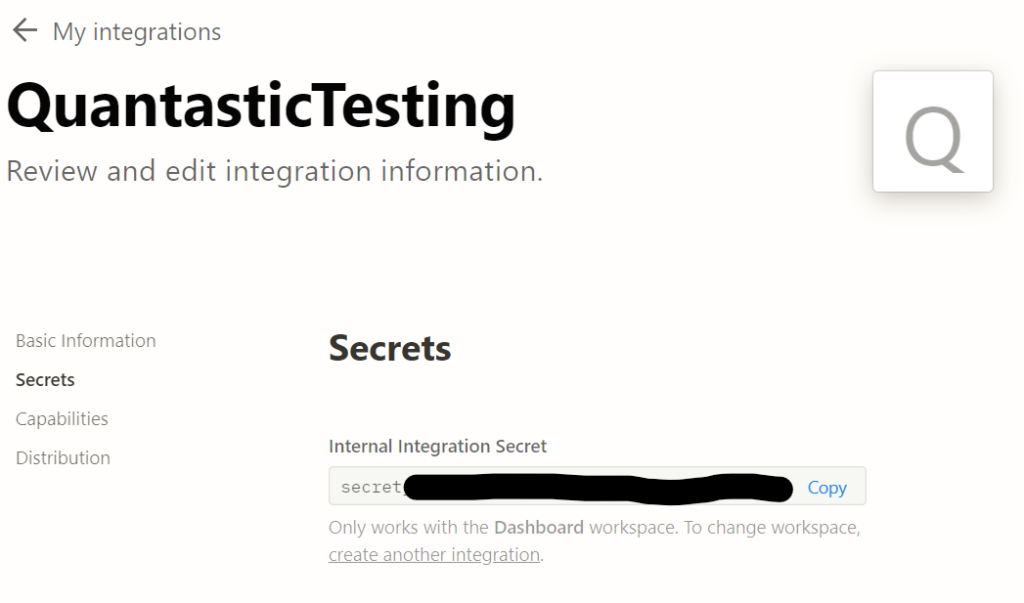
Accessing the Authorization Token
Click on Show to view the secret key associated with your new integration. Select Copy and paste it into a text file for later in this tutorial.
Connect the Database with the Integration
Now that you have a new integration, you need to connect it to your database.
Navigate to the database page you created in the first section of this tutorial. Make sure you are viewing it in Full-Page mode. Click on the three dots, go to Connect to, then select the newly created Integration (QuantasticTesting, in my case).
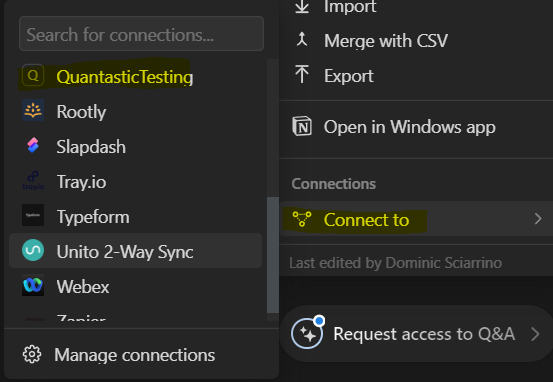
If you do not see the Connect to section in the menu, be sure you are viewing the page/database in Full-Page mode. Additionally, if your newly created integration is not showing up in the list of connections, then refresh the page and try again.
That’s it! The database is now connected to the new integration. We’ll start writing code after learning a bit more about the Notion API.
Interacting with the Notion API
We need to define a few constants in our Python code before we can start writing requests. They include:
- The secret token used as authentication to the Notion API
- The database identifier string
- A dictionary of headers that are required by the Notion API
You already know how to retrieve the secret token (see above). Next I’ll show you where to obtain the database identifier.
Database Identifier
The database identification string is found in the URL of the database page. If the URL looks as follows, then the database identifier is the portion of the URL labeled DATABASE_ID.
https://www.notion.so/{{DATABASE_ID}}?v={{something else...}}Headers
The headers you’ll need are shown below as a Python dictionary, where SECRET_KEY is a string variable holding the authentication token.
SECRET_KEY = "<<-- SECRET KEY HERE -->>"
DATABASE_ID = "<<-- DATABASE ID HERE -->>"
headers = {
    "Authorization": f"Bearer {SECRET_KEY}",
    "Content-Type": "application/json",
    "Notion-Version": "2022-06-28"
}
Reading From a Notion Database Using Python
Let’s take a look at the Notion API for Retrieving a Database. We need to write a function that sends a POST request to the endpoint:
https://api.notion.com/v1/databases/{DATABASE_ID}/queryThis is done using the requests module, installed using the command:
python -m pip install requestsThe code for retrieving the content of a Notion database, using the Notion API, is given below. Essentially, it uses the requests module’s post function to send a POST request.
import requests

def retrieve_notion_database(databaseID, headers) -> dict:
    readUrl: str = f"https://api.notion.com/v1/databases/{databaseID}/query"
    res: requests.Response = requests.post(readUrl, headers=headers)
    json_res: dict = res.json()
    return json_res

response = retrieve_notion_database(DATABASE_ID, headers)
print(response)
If you print the response you’ll get a mess of JSON data, stored as a dictionary. To make it easier on the eyes, you can import the pprint module and print it with the pprint function instead. It will look something like this:
{'has_more': False,
 ...
 'results': [{'archived': False,
              ...
              'parent': {'database_id': 'DATABASE_ID',
                         'type': 'database_id'},
              'properties': {'Action': {'id': 't~LS',
                                        'select': {'color': 'brown',
                                                   'id': 'L=\\m',
                                                   'name': 'Buy'},
                                        'type': 'select'},
                             'Date': {'date': {'end': None,
                                               'start': '2024-03-20',
                                               'time_zone': None},
                                      'id': 'vP%5BQ',
                                      'type': 'date'},
                             'Reason': {'id': '%5DUjD',
                                        'rich_text': [{'annotations': {'bold': False,
                                                                       'code': False,
                                                                       'color': 'default',
                                                                       'italic': False,
                                                                       'strikethrough': False,
                                                                       'underline': False},
                                                       'href': None,
                                                       'plain_text': 'Moving '
                                                                     'Average '
                                                                     '20 Day',
                                                       'text': {'content': 'Moving '
                                                                           'Average '
                                                                           '20 '
                                                                           'Day',
                                                                'link': None},
                                                       'type': 'text'}],
                                        'type': 'rich_text'},
                             'Ticker': {'id': 'title',
                                        'title': [{'annotations': {'bold': False,
                                                                   'code': False,
                                                                   'color': 'default',
                                                                   'italic': False,
                                                                   'strikethrough': False,
                                                                   'underline': False},
                                                   'href': None,
                                                   'plain_text': 'AAPL',
                                                   'text': {'content': 'AAPL',
                                                            'link': None},
                                                   'type': 'text'}],
                                        'type': 'title'}},
              ...
              }],
 'type': 'page_or_database'}
Notice how the results object’s value is a list. This list contains dictionary objects representing each row in the Notion database. Within each entry there is a properties object that holds all the values associated with each column in the given row.
I wrote the function below (get_rows) to convert this dictionary data into a list of simplified dictionary objects holding the values for each row in the database:
def get_rows(databaseID, headers):
    response: dict = retrieve_notion_database(databaseID, headers)
    alert_list = []
    for result in response['results']:
        alert = {
            "action":f"{result['properties']['Action']['select']['name']}",
            "date":f"{result['properties']['Date']['date']['start']}",
            "reason":f"{result['properties']['Reason']['rich_text'][0]['text']['content']}",
            "ticker":f"{result['properties']['Ticker']['title'][0]['text']['content']}"
        }
        alert_list.append(alert)
    return alert_list

rows = get_rows(DATABASE_ID, headers)
for row in rows: print(row)
The code above traverses the objects delivered from the Notion API response. This is very specific to my use case, so it may not work for you if you choose different property types in the database table. Consult the Notion API for details on database properties.
How to Add a Row to a Notion Database Using Python
Next we’ll look at adding a row of data to the Notion database table. To do this, we’ll need to consult the documentation for Creating a New Page. We need to do the following:
- Construct a POST request to the “https://api.notion.com/v1/pages” endpoint
- Define the database_id as the parent
- Define the properties and associated values to add to the database table
Constructing the POST Request
Again, we’ll use the post function provided to us by the requests module. We need to pass it the URL endpoint and the headers information. The databaseID parameter will become useful in a bit.
def add_row(databaseID, headers):
    url = "https://api.notion.com/v1/pages"
    result: requests.Response = requests.post(url, headers = headers)
    return result
Constructing the Payload Data
The above code will not work because we’re missing the payload data. The payload is the data we send along with the POST request telling the Notion API more information about what we want to do.
In this case, we need to tell it that the parent of the page we want to create is a database. This will allow the newly created page to be included in the table. We do this by defining the database_id value in the parent object:
payload = {
  "parent":{
    "database_id": databaseID
  }
}
Next, we need to add more information about the contents of each row. The Notion API requires that this information is given through the properties key in the payload dictionary object.
Additionally, each key within the properties object must match the name of each column in the database table. So far, we have this:
payload = {
  "parent":{
    "database_id": databaseID
  },
  "properties":{
    "Ticker": {},
    "Action":{},
    "Date":{},
    "Reason":{}
  }
}
Each of these properties has a specific type. In this case, the Ticker is a Title, the Action is a Select, the Date is a Date, and the Reason is a Text.
Each one of the types has it’s own way of being updated. The documentation falls a little short on how to do this, but with a little reverse engineering and the help of ChatGPT I was able to get the following code working:
payload = {
  "parent":{
    "database_id": databaseID
  },
  "properties":{
    "Ticker": {
      "title": [
                    {
                        "text": {
                            "content": ticker
                        }
                    }
                ]
    },
    "Action":{
      "select": {
                    "name": action
                }
    },
    "Date":{
      "date": {
                    "start": generated_date
                }
    },
    "Reason":{
      "rich_text": [
                    {
                        "text": {
                            "content": reason
                        }
                    }
                ]
    }
  }
}
So the final code for adding a row to the Database table, with reference to all of the above, is:
import requests
import json

def add_row(databaseID, headers, ticker, action, generated_date, reason):
    payload = { ... see above ... }
    data_load = json.dumps(payload)
    url = "https://api.notion.com/v1/pages"
    result: requests.Response = requests.post(url, headers = headers, data = data_load)
    return result
Notice how we use json.dumps to convert the payload dictionary into a JSON string. This is what is required by the Notion API’s non-form data. If this were regular form data, we might have been able to simply pass in the dictionary object.
Conclusion
From the above instructions and Python code you can interact with a database set up in Notion using the Notion API. To automate this, simply trigger the add_row() function to be periodically run under certain conditions. For Windows systems you can automate this using the Task Scheduler. Keep in mind the request limits on the Notion API.
Author
quantasticresearch.blog@gmail.com

Using a Random Forest Classifier to Classify Candlesticks
[Last Updated: 4/20/2025] Going through my current Data Science & Analytics studies, I was interested in applying a basic supervised learning model...
Read out all
Probabilities of Up and Down Days in the S&P500
[Last Updated: 11/24/2024] In this post we’ll be calculating the probabilities and statistics of up days and down days. First, I’ll use...
Read out all
Automating Python Scripts using Windows Task Scheduler
If you landed here, you’re probably interested in having a script run automatically at specified times on your PC. Specifically, a Python...
Read out all
A Comprehensive Guide for Creating NumPy Arrays
NumPy (short for numerical Python) is a useful library for mathematics and data science, specifically for working with arrays of data. In...
Read out all
Working with TOML Files in Python
TOML files (Tom’s Obvious Minimal Language) are the brain-child of Mr. Tom Preston-Werner. They were developed as an alternative configuration file format...
Read out all