If you landed here, you’re probably interested in having a script run automatically at specified times on your PC. Specifically, a Python script on Windows machines.
The solution below came from a failed attempt at building an Apache Airflow data pipeline solution with Windows Subsystem for Linux 2 (WSL2). The SQLite database that I’ve been working out of is in the local Windows directory, and there were many permissions and Python module import errors showing up when attempting to run the DAG scripts.
I can’t easily move the SQLite database to the Ubuntu instance because other scripts rely on it. After some research, I found out about the Windows Task Scheduler which can be used to schedule Python scripts. There’s also a PyWin32 wrapper module for interacting with Windows COM objects, which made this solution more interesting for future automation opportunities.
The Windows Task Scheduler
From Wikipedia, the Windows Task Scheduler is a job scheduler in Microsoft Windows that launches computer programs or scripts at pre-defined times or after specified time intervals. Within Task Scheduler you can easily create new tasks and set them up to run periodically, on events, or – strangely – just once.
There are a number of settings and triggers you can configure into the task “recipe” as well. For example, you can specify whether you want the task to run only when connected to AC power, or only when the PC is connected to a specific WiFi network.
Creating a Custom Task List
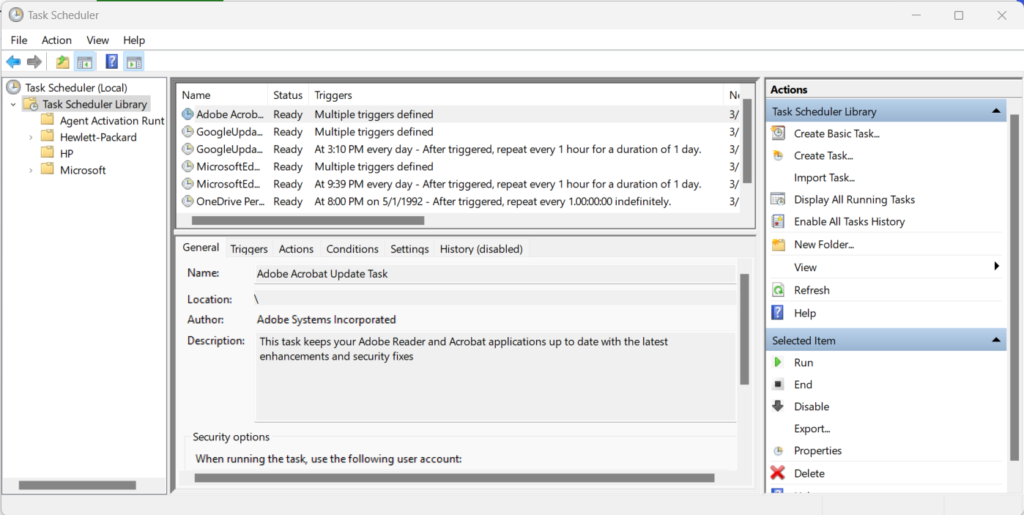
To start Task Scheduler on Windows, go to the Start menu and search for “Task Scheduler”. On Windows 11 it looks like this:

Open the Task Scheduler:

Right away you can see a list of Tasks that have already been configured on the PC. For me, it seems Adobe, Google, and Microsoft have configured their own tasks to run programmatically on my system.
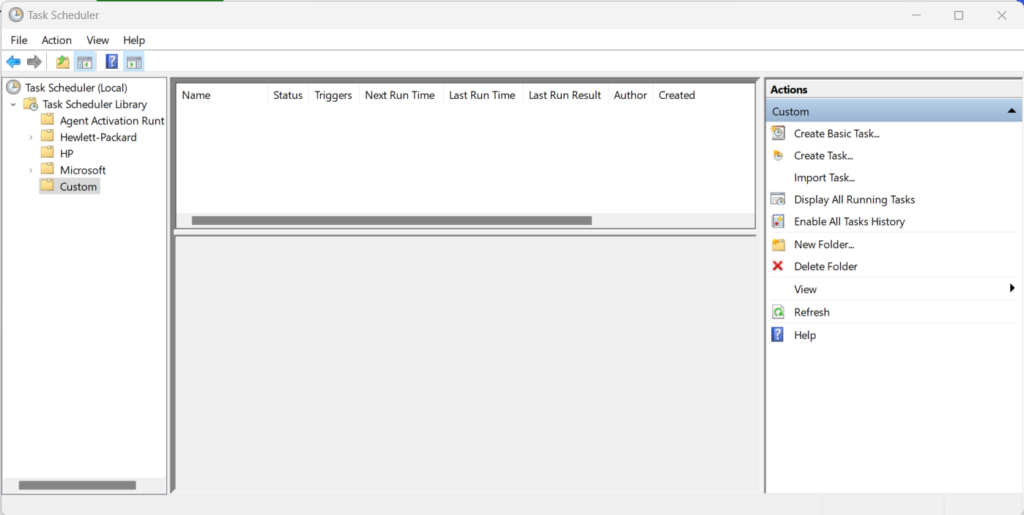
The right-hand side bar includes some quick-access tools and the left-hand side bar provides a directory structure where you can group and store your tasks.
In my case, I’m going to create all my custom tasks in a folder called Custom. Right click on the “Task Scheduler Library” folder, select “New Folder…”, and name it “Custom.”

Automating Python Scripts Using Task Scheduler
For this example, I created an example Python script called create_log_file.py that appends the current time to a text file (log.txt) in it’s own directory (C://Software/02 Custom).
# create_log_file.py
# Path: C://Software/02 Custom
from pathlib import Path
from datetime import datetime

print("Creating file...")

with open(Path('.') / 'log.txt', 'a+') as fd:
    fd.write(f"Log Time: {datetime.today()}\n")
fd.close()

print("File created.")
We are going to set this up to periodically run every 5 minutes using Windows Task Scheduler. I already have it open – see above for how to open the application.
Create a New Task
Right click on the Custom folder that we created above and select “Create Task…”. This opens the Create Task dialog. There are a ton of settings and parameters to configure, but we’re only going to focus on the bare minimum.
Select a Name for the new task. For me, it will be “Custom Log Updater”. Below that you’ll see that the Location is correctly set to our Custom folder we created.

Configure Trigger Conditions
Next, navigate to the Triggers tab. Click on “New…” to open the New Trigger dialog. Make certain that Begin the task is set to “On a Schedule”. Then, under Settings, choose Daily. Below, check the box next to Repeat task every… and select 5 minutes. Next to for a duration of: select Indefinitely.

The above Trigger configuration tells Windows to run the given task every 5 minutes of every day, indefinitely. At this time, it is 11:34 AM. You can set this to be any time of day that is convenient for you.
Press OK when finished.
Configure the Action
Next we need to tell the Task Scheduler which program to run. We do this by specifying three pieces of information:
- The location of your Python instance.
- The path in which your scripts sits.
- The name (with .py extension) of your Python script.
My Python installation is at C://Software/Python/python.exe. The path of my example logging script is C://Software/02 Custom. Finally, the name of the Python script is create_log_file.py.
Open the Actions tab and click New… to open the New Action dialog. The Action should be set to Start a program. Under the Settings section, the Program/script: should be set to the Python instance location (C://Software/Python/python.exe). Next to Add arguments, type in the name of the Python script (create_log_file.py). Finally, for Start in, copy and paste the path where the program resides (C://Software/02 Custom).

Press OK when finished.
Other Configurations
There are some default configuration options that might get in the way of running the script. The first one is under the Conditions tab.

Browse the Power section and you’ll see that newly created tasks default to only being run when the PC is connected to AC Power. If you’re on a laptop and running on battery power the task will not run. Set this to your convenience.
Additionally, if the Wake the computer to run this task is not checked, then the task will not run while the computer is in idle/sleep mode. In this case, since we’re running this every 5 minutes, it’s probably a good thing that we don’t wake up the computer every 5 minutes. Set this to your convenience.
Also, because this task has a low priority, it might be skipped by the Task Scheduler for more critical tasks. To ensure the script is run, go to the Settings tab and select the following options:
- Run task as soon as possible after a scheduled start is missed
- If the task fails, restart every [1 minute]
- Attempt to restart up to [3] times.

When you’re ready, press OK to create your new custom task!

Testing New Tasks in Task Scheduler
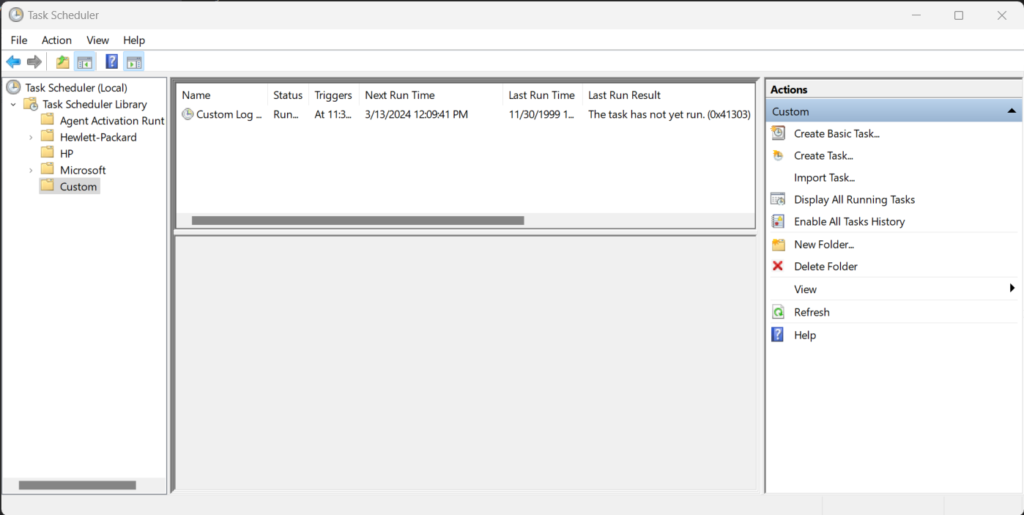
To test the newly created Task, turn your attention to the right-hand side bar. There is a Run button, which will run whichever task is selected in the center treeview.
Checking the text file reveals that the Task indeed ran:
# log.txt
Log Time: 2024-03-13 12:06:35.944673
Log Time: 2024-03-13 12:07:03.478867
Additionally, you can manually set the time to fabricate the triggering of the new task. For example, open the newly created task, go to the Triggers tab, and set the Start time in order to see if the task is triggering correctly.

After about 15 minutes, here are the contents of the log file:
# log.txt
Log Time: 2024-03-13 12:06:35.944673
Log Time: 2024-03-13 12:07:03.478867
Log Time: 2024-03-13 12:14:01.451596
Log Time: 2024-03-13 12:19:01.991050
Log Time: 2024-03-13 12:24:01.919839
Article Corrections and Contributions
Did you know you can contribute to Quantastic Research articles? For contributions, fill out the Article Contribution Form. For corrections, see the Article Correction Form. Use the standard Contact Form for all other inquiries.


